The tutorial in this section is an adapted version of Lesson 16 from the CSS in 10 Minutes text by Russ Weakly. The main change I've made to his code is that I wrapped a DIV element around his styled list. The styling I have applied to the horizontal menu is, therefore, slightly different than the styling in his material.
While there is a bit more markup, I did this because it offers more control over the placement and styling of the navigation components within the overall page layout. This navigation container DIV can be positioned and styled independently from the components inside the DIV (the list/menu) and separately from other major areas of the page - the header, footer, and columns.
Step 1: Set Up the Page
- Create a new document based upon the lesson template.
- You may use either an embedded or external style sheet.
The first thing we will do is set the page padding and margins to 0. We'll set the font size and page colors as well:
body {
   margin: 0;
   padding: 0;
   font-size: 100%;
   color: #000;
   background-color: #FFF;
   }
Step 2: Create the List
- In the HTML document body, create a basic unordered list.
The list items can be different in number and content than what I have used in the example below. Note that I used an empty anchor (#) as the href destination. We are only concerned with creating the navigation framework for now. You will need to replace the empty anchors with functioning URLs if/when you deploy this menu in your final project or any other web page you may build using this navigation template.
<ul>
   <li><a href="#">Home</a></li>
   <li><a href="#">About</a></li>
   <li><a href="#">Services</a></li>
   <li><a href="#">Staff</a></li>
   <li><a href="#">Portfolio</a></li>
   <li><a href="#">Contact</a></li>
</ul>
Step 3: Create the "topnav" DIV
- Wrap the list inside a DIV element and give it an ID of "topnav":
<div id="topnav">
<ul>
   <li><a href="#">Home</a></li>
   <li><a href="#">About</a></li>
   <li><a href="#">Services</a></li>
   <li><a href="#">Staff</a></li>
   <li><a href="#">Portfolio</a></li>
   <li><a href="#">Contact</a></li>
</ul>
</div>
Step 4: Style the "topnav" DIV
For this tutorial we will float the topnav DIV to the left. I have added orange background color and green top and bottom borders to the DIV element.
- Apply the following styling to the topnav DIV.
div#topnav {
   float: left;
   color: #000;
   background-color: #FC3;
   border-bottom: 1px solid green;
   border-top: 1px solid green;
   width: 100%;
   }
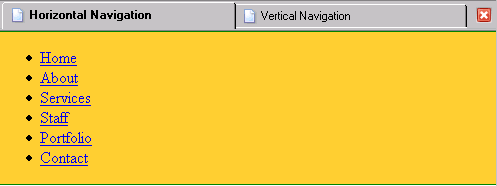
At this point your list should look similar to the example below; a normal list displayed in a left-floating DIV element.

The topnav DIV should be against the top-left corner of the document body for which we set margins to zero. The list still contains its default margins and padding which is why the list is currently indented from the left and has space between the DIV borders and the top and bottom of the list. We will eliminate all of this default list formatting shortly.
The topnav DIV width property has been set to 100%. This is what we want. Eventually the horizontal menu will be a thin stripe across the entire width of the browser window. In the screenshot above, you can see that the topnav container DIV already spans 100% of the window width but the list does not. We will be styling the list so that it displays horizontally.
float:left is because on the next page we will also set the list to float:left. When the DIV is not floated, XHTML will assign no height to the DIV element itself once the DIV's only content becomes floated. Assigning a float to the topnav DIV has the effect of opening up the height of the DIV element to accommodate internal elements which are also floated.