This tool goes beyond the functionality of the standard Dreamweaver 3 - Dreamweaver 4 Jump Menu. Please spend some time going through this documentation to familiarize yourself with the substantial power inherent in the PVII Jump Menu Magic Extension.
In addition to the above Targets, if the PVII Jump Menu UI is opened while in a frameset document, all frame names will be listed in a dropdown list to select as Targets. Besides selecting targets from the dropdown list, you are free to type in a target of your choice! This means that if you create a Jump Menu on a page that lives within a frameset, you can still edit the menu if you open the page by itself, as opposed to having to open the entire frameset. In the standard Dreamweaver Jump Menu, this is not possible.
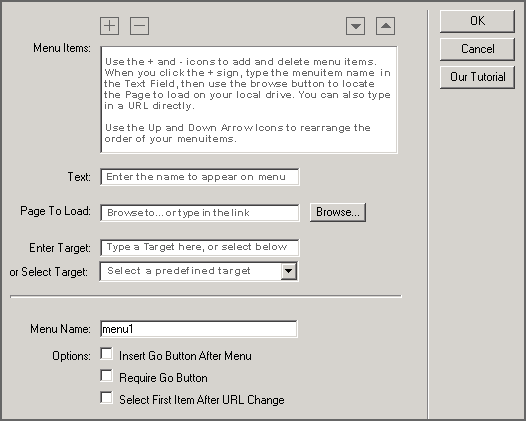
You can apply targeting at the option level. If you insert 6 links into a PVII Jump Menu, each link can target a different frame, or some can open in new browser windows!
If you choose the Require Go Button option, the Behavior Panel will show an onDblClick event for the Select Menu. This will prevent the menu firing when the user is going through the Menu List... making the Go Button the only way for users to operate the menu.
If you want both the onchange event and the Go Button to be active, check the Insert Go Button After Menu option box, but leave the Require Go Button unchecked.
Although this extension supports using the LIST button on the Property Inspector, we suggest that you always perform edits by using the Behavior Palette to open the PVII Jump Menu interface.
Please be aware that if you add dynamic content via the LIST button, UltraDev will insert asp code into the <select> tag. Consequently, as with the standard DW Jump Menu, the PVII Jump Menu will no longer allow you to edit via the Behavior Panel. Attempting to do so will generate an error message, but will not harm the code.
Since both the value and the target fields of the PVII Jump Menu can be edited, you can manually insert asp code to populate the name, value and target for each Menuitem. Effectively, if your database has Myname, Myurl and Mytarget fields you can control the full functionality directly from the database.
UD will automatically insert the asp code to populate the Menuitems from the recordset. Now you can control the Jump Menu directly from the data in your database, including the appropriate target for each menu item.
Now that Netscape 6 has been released, CSS becomes a far more pervasive solution to using Jump Menus that can be visually incorporated into a design. Here is a brief explanation on how to get your jump menus to look like the samples on this page...
We use 3 CSS styles to accomplish our stylized menu and Go button. Here they are:
Since Netscape 4 has some rendering problems with Border Styles on Buttons, it's advisable to trick NN4 into not using the special button and menu styles. We do this by carrying our page's CSS in an externally linked file. Then we create a second CSS file and use the @import method to attach it to our page. It is into this imported CSS file that we put the styles we don't want Netscape 4 to see. Why? Because Netscape 4 does not support imported CSS files, while IE and NN6 do! So the above 3 styles are placed in their own separate CSS file. Here is the way it looks in the head of our document:
<head>
<title>PVII Jump Menu Magic</title>
<meta http-equiv="Content-Type" content="text/html; charset=iso-8859-1">
<link rel="stylesheet" href="mainscape.css" type="text/css">
<style type="text/css">
<!--
@import "main.css";
body { margin-top: 16px; margin-right: 24px; margin-bottom: 0px; margin-left: 24px}
-->
</style>
</head>
Style Sheets are cascading. So, there is a hierarchy involved. In the above example, because IE and NN6 understand everything in the <head>, they will give priority to the style sheets in this order:
So, all the main styles can be placed in the Linked file, while the IE-NN6 specific styles are kept in the imported file.
To make the rollover effect on a form button, we use the PVII W3C Change CSS Class Behavior. It is available on our site or on the Dreamweaver Exchange. Once you download it, access its tutorials to learn how to deploy it on your page.
For further help and tutorials visit our web site:
For Technical Support, visit:
In the support group, you can learn how to deploy a PVII Jump Menu and make it look as good as ours.
See you in the newsgroup!
Al Sparber - Gerry Jacobsen
Project VII Development
Copyright © 2000 Project Seven Development
SOURCE: C:\Documents and Settings\djnmarti\Application Data\Macromedia\Dreamweaver 8\Configuration\Shared\Studio VII\jumphelp\tutHelp.htm