Date: Apr 14, 2009
Return to the article FROM: http://www.peachpit.com/articles/article.aspx?p=1332858 (accessed 9/9/13)
When working in Photoshop, you’ll often need to combine multiple images together into a new composite image. Those original images, however, may have backgrounds or objects that you no longer want. This is where Layer Masks come in.
Lesson files for this excerpt can be found here.
When working in Photoshop, you’ll often need to combine multiple images together into a new composite image. Those original images, however, may have backgrounds or objects that you no longer want. This is where Layer Masks come in. Far superior to erasing pixels, Layer Masks allow you to hide (or mask) part of a layer using powerful painting and selection tools. The more you work on combining multiple images, the more you’ll find yourself using masks.
)
Layer Mask Essentials
In this chapter, you’ll revisit several techniques that you learned in Chapter 5, “Selection Tools and Techniques.” Masks generally start as a selection, which is then attached to a layer. The mask can be refined by adding to it with black or subtracting with white. Learning to create and modify masks is an important skill that becomes significantly easier with a little practice.
Adding Layer Masks
The best way to learn about Layer Masks is to jump right in and create one. You’ll start with an easy image, but one that will help illustrate the important concepts. Let’s get started:
- Open the file Ch07_Mask_Start.tif from the Chapter 7 folder on the book’s CD.
- Convert the Background layer into a floating layer by double-clicking its name in the Layers panel. Name the layer Tower.
- Select the Quick Selection tool from the Tools panel.
- Make a selection of the blue sky.
- Reverse the selection by choosing Select > Inverse. The building is now selected.
- Click the Add layer mask button to add a mask to the layer.
- To make it easier to see the edges of the border, place a solid color layer behind the Sundial layer. Choose Layer > New Fill Layer > Solid Color. Choose a color that is not in the image, such as green.
- Drag the fill layer below the Sundial layer in the Layers panel.
- Depending on the accuracy of your initial selection, your mask may be usable as is. If needed, you can quickly touch it up using the Brush tool.
- Click the Layer Mask thumbnail to select it.
- Activate the Brush tool by pressing B or by choosing it from the Tools panel.
- Press D to load the default colors of black and white. Black will add to a mask and create transparency; white will subtract from the mask. Using gray or blurring will create a softer edge.
- Zoom in to better see your edges. You can use the Zoom tool or the Navigator panel to get a better look at your edges.
- Paint with a soft-edged brush to refine the mask. If you add too much to the mask, press X to toggle the mask colors. Remember, painting with black will add to the mask (hence removing or masking the image).
- You can improve the edges of the mask by using the Blur tool or the Smudge tool on the edges. You can stop tweaking when you are satisfied with your results.


Disabling Layer Masks
The primary benefit of masks is their flexibility. In the previous section you explored that flexibility by adding and subtracting to a mask. This flexibility can also be used to temporarily disable a mask. This can be useful if you want to check your progress or if you need to restore the original image to use on another project:
- Work with the Tower image from the previous exercise or open the file Ch07_Mask_End.tif from the Chapter 7 folder.
- Select the Layers panel so it is active.
- Shift-click the Layer Mask thumbnail to disable it. Alternately, you can right-click the mask’s thumbnail to access more options, such as deleting it and permanently applying it.
- To re-enable the mask, Shift-click its thumbnail again.
)
Deleting Layer Masks
After going through the effort of creating a mask, you are unlikely to want to permanently discard it. But if you change your mind and are certain you want to delete it, doing so is easy:
- Work with the Tower image from the previous exercise or open the file Ch07_Mask_End.tif from the Chapter 7 folder.
- Select the Layers panel so it is active.
- Click the Layer Mask thumbnail. Drag it to the trash icon in the Layers panel.
- A dialog window appears asking you to decide what to do with the mask:
-
Delete: Discards the mask and restores the image to its premasked state.
-
Cancel: Allows you to cancel the command and return the image to its masked state.
-
Apply: Permanently applies the mask and deletes the pixels that were originally masked.
- Click Apply to permanently apply the mask. The mask is used to permanently discard portions of the masked layer in a destructive edit.

Using Vector Masks
Most users choose to work with the raster-based Layer Masks previously discussed. These raster-based masks tend to be the easiest to work with and allow the most flexibility in editing due to the wide variety of tools you can use to modify the mask. However, some users prefer to work with vector tools like the Pen tool or the Shape tools because of personal preference (or more experience with programs like Adobe Illustrator). There are several ways to add a Vector Mask:
- After you’ve added a raster Layer Mask, click the Add layer mask button in the Layers panel to add a second mask that is vector-based.
- To add a Vector Mask initially, Command/Ctrl-click the Add layer mask button when adding the first mask.
- To add a new (empty) Vector Mask, you can choose Layer > Vector Mask > Reveal All.
- To hide an entire layer, choose Layer > Vector Mask > Hide All.
Mask Creation Strategies
There are many different approaches to creating Layer Masks. The approach you should take will vary based on your source image. Let’s try four different images and techniques to perfect your Layer Masking ability.
Using a Gradient as a Mask
When designing, you may need to gradually blend the edges of an image. This can be easily accomplished by combining a Layer Mask and a gradient. Let’s give it a try:
- Open the file Ch07_Gradient_Mask.tif from the Chapter 7 folder.
- Duplicate the Background layer by pressing Command/Ctrl+J.
- Select the top layer and choose Image > Adjustments > Desaturate.
- With the topmost layer active, click the Add layer mask button at the bottom of the Layers panel. A new, empty Layer Mask is added to the layer.
- Press G to select the Gradient tool.
- Press D to load the default colors of black and white.
- From the Options bar, choose the black-to-white gradient. If it’s not available, choose Reset Gradients from the Gradient Picker’s submenu.
- With the Layer Mask selected, click and drag to create a new linear gradient going from top to bottom in the document window.

)
The new Layer Mask will create a gradual blend from the grayscale version to the colored version.
This technique of adding a mask can also be used on one layer to create a gradual fade to transparency or to a different layer stacked beneath.
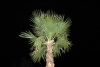
Using a Channel
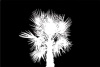
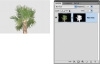
Oftentimes, a channel will get you very close to a perfect Layer Mask. This technique works particularly well when the subject is against a high-contrast background (such as a sky or a wall), and it works very well with fine details like hair. The image can be masked so it is ready for integration into a composite image. For example, a masked image could be used to add a palm tree to another photo. Let’s give it a try:
- Open the file Ch07_Channel_Mask.jpg from the Chapter 7 folder. This image was shot against a night sky using a flash.
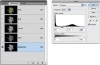
- Switch to the Channels panel and examine the red, green, and blue channels. Look for one with high contrast from the background. While all three channels are fairly high contrast, the green channel stands out the most.
- Duplicate the green channel by dragging it onto the New Channel icon at the bottom of the Channels panel (it looks like a pad of paper).
- Rename the new channel Selection by double-clicking its name.
- With the Selection channel selected, press Command/Ctrl+L to invoke a Levels adjustment. Levels is a powerful command that allows you to adjust the gamma (gray) point as well as the black and white points.
- Move the black slider to the right, setting the Input Level to around 60. The black in the channel should get crisper.
- Move the white slider to the left, setting the Input Level to around 100. The gray areas in the channel should switch to pure white.
- Move the middle (gray) slider to refine any gray spots in the channel. A value of 2.25 should be approximately correct.
- Command/Ctrl-click on the Selection channel’s thumbnail to load the selection.
- Turn off the visibility for the RGB channels by clicking the RGB composite channel’s visibility icon. Turn off visibility for the Selection channel.
- Switch to the Layers panel.
- Turn the Background layer into a floating layer by double-clicking its name in the Layers panel. Name the layer Palm Tree.
- Click the Add layer mask button at the bottom of the Layers panel.
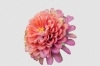
Using the Color Range Command
Sometimes, a color (or range of colors) will be very present in your image. This color can be used to quickly create an accurate Layer Mask. Even if the color cannot be used to select the object entirely, you can always harness the Brush tool to clean up stray areas.
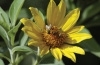
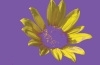
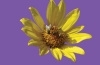
- Open the file Ch07_Color_Range.jpg from the Chapter 7 folder.
- Turn the Background layer into a floating layer by double-clicking its name in the Layers panel. Name the layer Bees and Flower.
- Choose Select > Color Range to make a selection based on a range of colors. Select the Localized Color Clusters option to reduce the selection area to just the chosen colors.
- With the Eyedropper tool, click within the yellow area of the flower to make an initial selection. Hold down the Shift key and drag through other areas of the flower to add to the selection.
- Leave the Fuzziness set to a low value (30–40). When most of the flower is selected, click OK to create an active selection.
- Click the Add layer mask button for the layer. The petals will display well, but parts of the flower will be missing.
- Add a solid color layer to make it easier to see your edges. Choose Layer > New Fill Layer > Solid Color. A purple layer will help things stand out nicely. Click OK and drag the solid layer below the masked flower.
- Examine the masked layer closely. You will need to paint in part of the center of the flower. Additionally, some of the petals contain unwanted transparency. You may also see some leaves or stems that have bled through. You can fix all these problems quickly using the Brush tool.
- Press D to load the default colors of black and white.
- Select the Layer Mask attached to the Bees and Flower layer.
- Press B to activate the Brush tool. Adjust the size of the brush and its hardness settings so you have a small brush with a gentle edge (an 80-pixel brush with a hardness of 75% is a good place to start). Make sure the brush is set to 100% opacity.
- Paint in spotted or missing areas with white. You can remove any unwanted areas by painting with black.
- When finished, you can save the image as a layered file such as a TIFF or PSD formatted file.

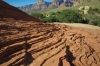
Using Calculations
You explored the Calculations command to create an advanced selection in Chapter 5. This command uses channel data to create a new alpha channel. You can then refine the channel to create an accurate selection. You can also take this one step further to make a high-quality layer mask. Let’s give it a try:
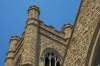
- Open the file Ch07_Calculations.tif from the Chapter 7 folder.
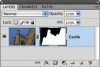
- Turn the Background layer into a floating layer by double-clicking its name in the Layers panel. Name the layer Castle.
- Call up the Channels panel and closely examine the channels for a high contrast between the lamp and the background. While all three channels have contrast between the sky and the castle, the blue channel has the best.
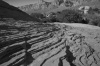
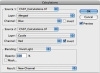
- Invoke the Calculations command by choosing Image > Calculations.
- Set Source 1 to the Blue channel; set Source 2 to the Red channel and select the Invert check box. The red channel differs most from the blue channel in this image, so it will create a good matte.
- Experiment with different blending modes so you get a clearer separation between the castle and the sky. In this case, the Vivid Light mode works best to create a new channel. Click OK.
- The new channel will need a little touch-up. You can get the channel near perfect with a Levels adjustment. Press Command/Ctrl+L to invoke the Levels dialog box.
- Adjust the black, white, and gray points for Input Levels to improve the matte. The results will be closer but not complete. Click OK when satisfied.
- With your Brush tool, paint out the windows with black.
- You then need to reverse the channel so the area you want to discard is black. Press Command/Ctrl+I to invert the channel.
- Soften the selection by blurring it. Choose Filter > Blur > Gaussian Blur; set it to a value of 1 pixel and click OK.
- Load the channel as a selection by Command/Ctrl-clicking the channel’s thumbnail.
- Turn on the visibility icon for the RGB channels and turn it off for the alpha channel.
- Switch to the Layers panel and select the Castle layer.
- Click the Add layer mask button to apply a mask to the selected layer.

Refining Masks
By now you should be feeling more comfortable making layer masks. However, there’s always room for improvement (at least where masks are concerned). Let’s take a look at three ways to refine or adjust a mask.
TIP
The Masks panel offers several other useful commands. You can load a mask as a selection, apply a mask, disable its visibility, or discard it. Additionally, you can use the Color Range or Invert commands to further refine the selection. The Masks panel consolidates all the masking commands into a single location, which can save you valuable time.
Using the Masks Panel
Photoshop CS4 offers the new Masks panel just for refining masks. It combines several tools and commands into one location, and makes it much easier than before to adjust a mask (even after applying it). In fact, the Mask Edge and Color Range options are identical to the selection commands you’ve previously explored.
- Open the file Ch07_Masks_Panel.psd from the Chapter 7 folder.
- Select the Fire Hydrant layer’s mask.
- Experiment with the Density and Feather sliders to see their effects.
-
Density: Reduces the overall impact of the mask by essentially lowering the opacity of the layer mask.
-
Feather: Creates a gentle edge to the mask.
-
- Set Density to 100% and Feather to 0 px.
- Click the Mask Edge button to open the Refine Mask dialog box. The controls are identical to the Refine Edge dialog box except here they are used to modify the layer mask.
- Adjust the Mask Edge properties to remove fringe from around the image.
- Click OK to apply the change to the layer mask.

Maximum and Minimum
Photoshop offers two specialty filters for refining masks. Lumped into the amorphous “Other” category, most users miss the Minimum and Maximum filters. Both are useful for modifying a mask because they can expand or contract the mask.
-
Maximum: The Maximum filter applies a choke, which spreads the white areas and chokes the black areas. This filter will expand a Layer Mask outward, which is useful if the matte is hiding too much of the image.
-
Minimum: The Minimum filter applies a spread, which expands the black areas and shrinks the white areas. This filter will reduce a Layer Mask and contract it. This is useful if the matte has a fringe around the outside edge.
)
- Open the file Ch07_Flower.psd from the Chapter 7 folder.
Notice the thin black border around the flower.
- Select the Layer Mask’s thumbnail.
- Choose Filter > Other > Minimum to contract the mask. A value of 3–7 pixels should be enough to contract the edge to remove the border.
- Click OK when satisfied.
Using Smudge and Blur
Sometimes, a mask is close to being ready to apply but needs a little touch-up. What better way to do this than to paint? By using the Blur and Smudge tools you can polish problem edges.
-
Blur: Choose the Blur tool to soften a hard edge that looks unnatural. Just be sure the mask is selected before blurring.
-
Smudge (Lighten): Choose the Smudge tool and set its mode to Lighten in the Options bar. This is useful for gently expanding the matte. Leave the Strength set to a low value to make gentle changes.
-
Smudge (Darken): Choose the Smudge tool and set its mode to Darken in the Options bar. This is useful for gently contracting the matte. Leave the Strength set to a low value to make gentle changes.
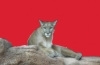
Open the file Ch07_Lion_Mask.tif to experiment with the Smudge and Blur tools.
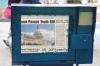
Adjusting Content Within a Mask
By default, layer masks are linked to their respective layers. Applying a transformation (such as a Free Transform command) will affect a layer and its layer mask. However, there are times when you won’t want this default behavior to occur. Sometimes, it is useful to adjust the contents of a masked layer without repositioning the mask. Let’s give it a try:
- Open the file Ch07_Mask_Content.psd from the Chapter 7 folder. Even though the layer mask is accurate, too much of the layer’s content is obscured.
- Click the chain icon between the layer thumbnail and layer mask icons for the Newspaper layer. You can now manipulate the layer content or its mask independently.
- Select the Newspaper layer’s thumbnail to modify the visible pixels of the layer.
- Press Command/Ctrl+T to invoke the Free Transform command. Scale the Newspaper layer smaller and move it slightly to better fit the opening in the newspaper stand. Click the Commit button to apply the transformation.


)
)
)
)
)
)
)
)
)
)
)
)
)
)
)
)
)
)
)
)
)
)
)
)
)
)
)
)
)