


|
|
|
|
|
|
|
|
Martha's COIN 74 Week 4 Exercises
Day Two - Image Rollovers
Dreamweaver makes is super easy for you to create nifty rollovers. A rollover uses two images. To do this project, get two images of the same dimensions. Basically we're going to use Dreamweaver's JavaScript to tell the browser to replace one image with the other when the user mouse or rolls over the image. If your images are not the same pixel size DW will resize the second image by using the size of the first image and distorting the second. Oh, by the way, you don't have to know a thing about JavaScript to create an Image Rollover. DW does it behind the scenes. If you do want to learn how it's done, open the Code Inspector or Show Code and Design Views of your Document Window as you work.
Preparing an Image Rollover
1. Prepare 2 images of the same pixel dimensions. By convention, image dimensions are listed with width first followed by height. Here I have two images that are both 400w x 60h. I will use these in this demonstration. You're welcome to copy these two images to your computer by right-clicking or control-clicking and saving images to disk. Then you can use them for your rollover too. That's what I chose to do - see my image roll-over at the top.
2. After you determine which images you are going to use, click the cursor where you'd like to insert the rollover.
3. Go to the Common Category of the Insert Bar and click on the dropdown arrow to the right of the Image button.
Choose the Rollover Image option. This will bring up the Insert Rollover Image Dialog Box. DW enters a default name for the image based on how many images you already have on your page. Keep the Preload Rollover Image checked.
4. Click Browse to select the Original Image. The Original Image is the one that is displayed in the Up position before the user mouses or rolls over the image. Dreamweaver opens the Original Image window from which you can select your image.
5. Now Browse for the Rollover Image and DW will open the Rollover Image Window (check the title bar on your window) to select the image that will replace the original when the user mouses over.
6. After selecting your Original and Rollover images, enter the URL to send the user to a linked page. You see the Image Rollover is actually a link. If you don't want the user to be sent anywhere, type javascript:; to create a null link. The rollover will still take effect. I chose to set mine up with an actual link - I HATE links that go nowhere!
7. Preview in Browser to see your first rollover. Check it out !
After you insert the Rollover Image, the icon for the Image in the Insert Bar will be a Rollover Image icon. DW assumes that you might do a series of Rollovers. Take a look at your Common Insert Bar now and see if the image of a tree is replaced with the image of a rollover image. Also, remember that you can use keyboard shortcuts or the Insert Menu to insert any of these objects onto your page.
Client-side Image Maps
|
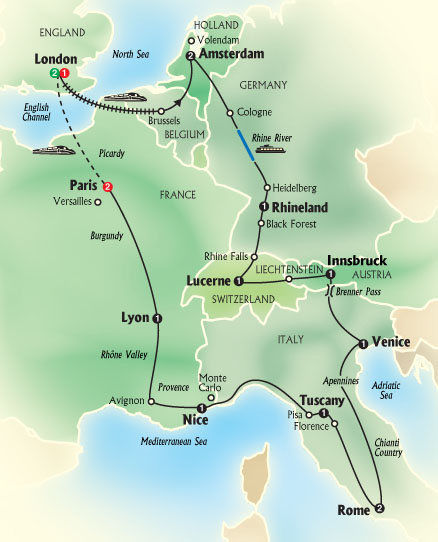
Click CITY NAMES for info about our European Tour 2006 |
|---|
Image Map by Martha, made10/10/06 for COIN74 using Dreamweaver
An image map is an image that has MORE THAN ONE area defined by coordinates based on invisible shapes drawn over the coordinates. These invisible shapes are known as hotspots and are areas that are hyperlinked. These invisible shapes are linked to specific html pages. When the user rolls the cursor over the invisible shapes the cursor turns into a hand indicating to the user that the shape is a hot spot which links to another file or named anchor on the same page. To do this project, you'll need one image with a few definable areas. I chose to make hotspots out of the names on a map.
To create your own image map, just follow the steps below.
1. Click the cursor at the place in your html file where you want to create your image map.
2. Insert the graphic that you will convert into the image map. Select an image that has OBVIOUS areas which can become hotspots to different web pages. These areas should be obvious to the user. This should not be a game to try to find the hidden hotspot. The hotspots should have meaning to the user....
3. Select the image and expand the Properties Inspector's bottom pane if it's not already open. Fill in the fields these fields:
4. Select one of the 3 Hotspot Tools. The choices are: Rectangular, Oval, and Polygon. You will use these to draw invisible shapes over the areas you want to define. The shapes will appear to be a cool blue color as indicated in the PI, but just like in Flash - these invisible 'buttons' will not appear in the web browser. They are merely identifying the coordinates by which the browser will interpret the area of the hotspot...
With your selected hotspot tool, click hold and drag to define an area of the image. To create a perfect square or circle, hold down the Shift key while using the Rectangular or Oval Hotspot Tool.
5. Select the Polygon Hotspot Tool to define an irregularly shaped hotspot. To create the shape, click once wherever you want to add an angled corner. Add the links and Alt text.
Select a hotspot and use the Pointer Hotspot Tool to resize or reshape by clicking and dragging on the handles. You can move the selected hotspot to a new location by dragging or by using the keyboard arrow keys which move one pixel at a time. Hold down the Shift key and you can move 10 pixels at a time.
6. Test your image map in both browsers. Oops, I only have one browser! Better download Firefox...
You can also access the Image Map tools from the Insert Bar's Common Objects by clicking on the Image Dropdown Menu and selecting the tool you want to use to define the hot shape.
Questions about the Image Map
1. Can I link it to other web sites?
2. I'm not sure how obvious it should be, or how obvious mine is.
3. Is it correct if I put a few images together and make them into one jpg or gif file, then use it as an image map?
1. Each hotspot can be linked to places within your web site using the anchor tag, OR external web sites using an absolute URL such as http://www.google.com target="_blank". I linked my hotspots to outside websites.
2. VERY OBVIOUS....each hit state or hot spot should be obvious to the user...My map names are too close!
3. Yes, you can combine image using an image editing program and save as .gif or .jpg. If the images are mainly text and broad areas of color, save as a .gif. If the images are photographic or blended transformations of color, use .jpg.
Page Created 10/10/06 Page Completed 10/11/06 Assignment Submitted 10/17/06
Document Last Modified:
© mjraup 2006
Webmaster
