


|
|
|
|
|
|
|
|
Martha's COIN 74 Week 9 Exercises
Day Two - CSS Panel
Creating Styles using the CSS Styles Panel
Open the CSS Styles Panel by going to the Window Menu - Window > CSS Styles. You will see .style 1, .style2 and .style3 listed in the All Rules window. To see a style's associated attributes, click on the style and view its properties in the Properties window.
If you can't read all the properties for a style selection, drag the panel away from the edge of your screen and use your mouse to widen the window containing the CSS panel...Review the CSS Styles Panel carefully. All panels have an option button at the top right of the panel. Click the options button to see the available menu commands. We will work more with the icon buttons on the bottom right of the panel than we will with the menu options. The icon buttons on the bottom represent from left to right: Attach Style Sheet, New CSS Rule, Edit Style..., and Delete CSS Style.
![]()
Click on the New CSS Styles button, the second from left with the + plus sign on it. This will open the New CSS Style Window.

By default, the New CSS Style window Selector Type radio button was on Tag. Therefore the middle dropdown menu label is Tag, and the menu allows you to choose which HTML tag you wish to attach your new style to. When you change the Selector Type to Class, the top dropdown menu label will be Name. When the Selector Type is Advanced, the top dropdown menu will be Selector. The Define in field allows you to choose where the style should be stored -- in the current document only, in a new CSS style sheet, or in a previously defined style sheet.
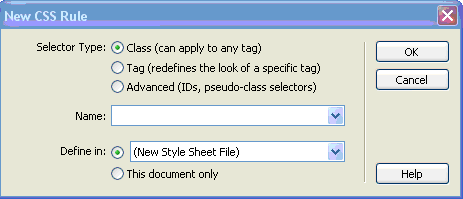

Select the Tag Radio Button for the Selector Type and the This document only for the Define in: Radio Set. Select the li tag from the Tag: dropdown menu to define a style for list items.

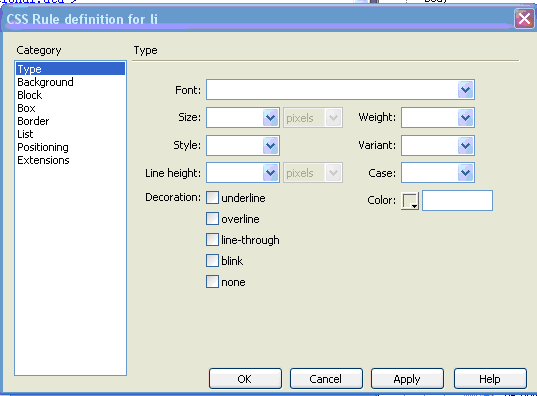
Press the OK button and the CSS Style definition window for the selected tag, li, will display. This is the window in which you will define the attributes for your list item. Explore the window by going through each of the dropdown menus in the Type category. When you've filled in the attributes for the Type category, select the Background category and select a color that contrasts the color you've selected for the font in the Type category. Notice that this window is similar to the layout of several other Dreamweaver windows, such as the Preferences window. The Category is listed on the left side and the Type is listed on the right.

continued on page 3
Page Created 11/25/06 Assignment Submitted xx/xx/06
Document Last Modified:
© mjraup 2006
Webmaster